This will be an interesting write-up, as I imagine this page will be half guide, and half living journal.
A special thank you to the efforts of:
- Kholia’s OSX-KVM project
- Nicholas Sherlock for his work in adaptation of the OSX-KVM project, and project builds.
- Leoyzen and tpruszin for their generic OpenCore configuration file for KVM.
- corpnewt for his work on
gibMacOS. - Dortania’s OpenCore Guide.
Here before you, has been a project of mine in the making for a few years now, and many a hypervisor! Before we begin, I would like to establish a few things.
This project began in 2020 as a direct result of a couple of factors. \
-
My need for an XCode environment, needed for Swift app development for an internship I was managing at the time
-
IMessage relay for me, and my “non-apple-ecosystem” friend and family member. All aligned with Android at the time.
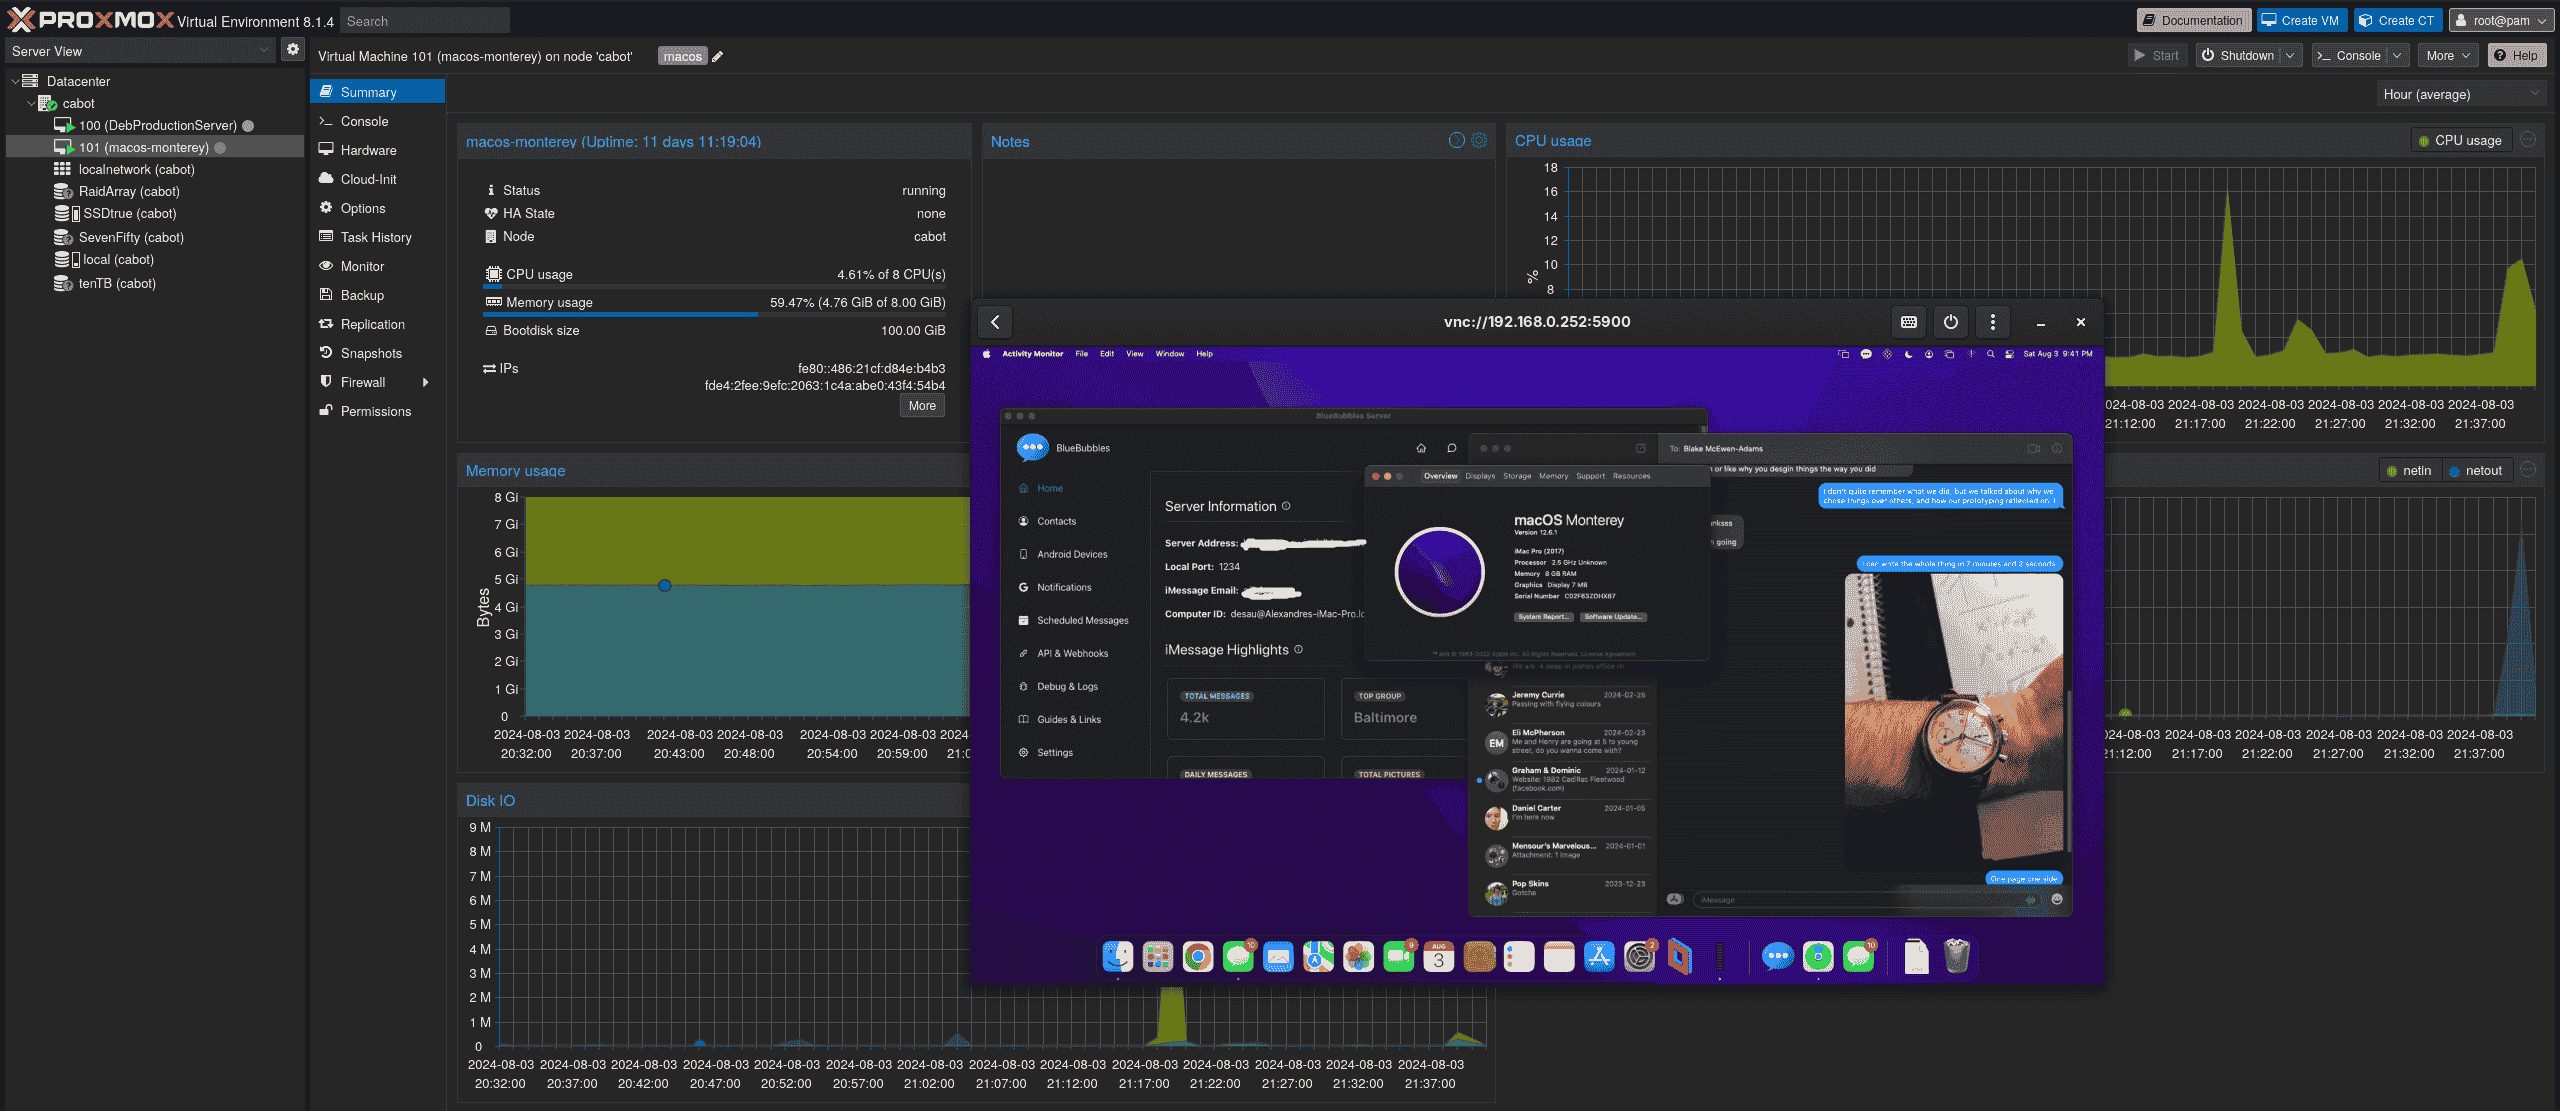
- This would be run through a BlueBubbles Server and series of clients.
- This is an unfortunate truth of the North American mobile reality… IMessage or bust.
-
This would be run through Proxmox using the following hardware
- 2x AMD Opteron 6380 (Eight cores allocated across several NUMA nodes).
- AMD RX 460 (in theory, most Polaris, Vega, or RDNA 1/2 cards should be a drop in. *Please refer to the AMD GPU section on the OpenCore GPU Guide*).
- Generic Proxmox KVM created devices.
Note
- The following guide specifically refers to the AMD Opteron 6300 (Abu Dhabi) and 6200 (Interlagos) families of chip. The following is not possible using first generation 6100 (Magny-Cours) chips, as the SSE 4.2 instruction set is required, and not available on the Magny-Cours chips.
If you are looking for a general guide, not specific to the exact hardware used, PLEASE consult Nick Sherlock’s KVM Guide.
First step: Creation of an installation ISO
There are a few ways to do this. The “UNIX” way and the other way. In this write-up, I’m using macOS Monterey. They both behave similarly, and will download a Monterey installer directly from Apple’s server’s, and then build it for you into a final Monterey-recovery.img
Big Sur is pretty similar, but has harsher SSE requirements, putting me out of luck.
The UNIX Way.
So, this is actually pretty simple. However, you’re going to need a Mac or Linux system to move on from here.
First, you’ll want to download Nick Sherlock’s OSX-KVM package, and unzip it.
https://github.com/thenickdude/OSX-KVM
You’ll now need some build requirements, which we can run the mac Terminal to grab for us. Pop the macOS terminal open here. xcode has the command line build tools we’ll need.
xcode-select --install
If you’re building on Linux, you’ll want to grab the appropriate build tools as well.
APT based distributions (Ubuntu, Debian)
sudo apt install qemu-utils make
RPM based distributions (Fedora, RHEL)
sudo dnf install qemu-utils make
Now, you’ll want to navigate to the proper OSX-KVM folder’s root. Pop open the terminal from that folder, or navigate there using cd.
Once you have arrived, run the following commands.
cd scripts/monterey
make Monterey-recovery.img
This might take a minute to build for you, but should produce an useable Monterey-recovery.img!
A little tidbit, if you are building on a Mac, you have the option of building a full image, which makes it a true full “offline” install. You won’t need an internet connection upon initial installation, and you can do this with the following set of commands.
cd scripts/monterey
make Monterey-full.img
All done! You can now skip to the next step.
The other way (Windows/NT)
This method of building a Monterey image is fundamentally very similar to the UNIX way, by scraping the needed macOS components directly from Apple, and then building them.
We’ll be relying on a Python script, known as gibMacOS to do this for us, and that can be found here
https://github.com/corpnewt/gibMacOS
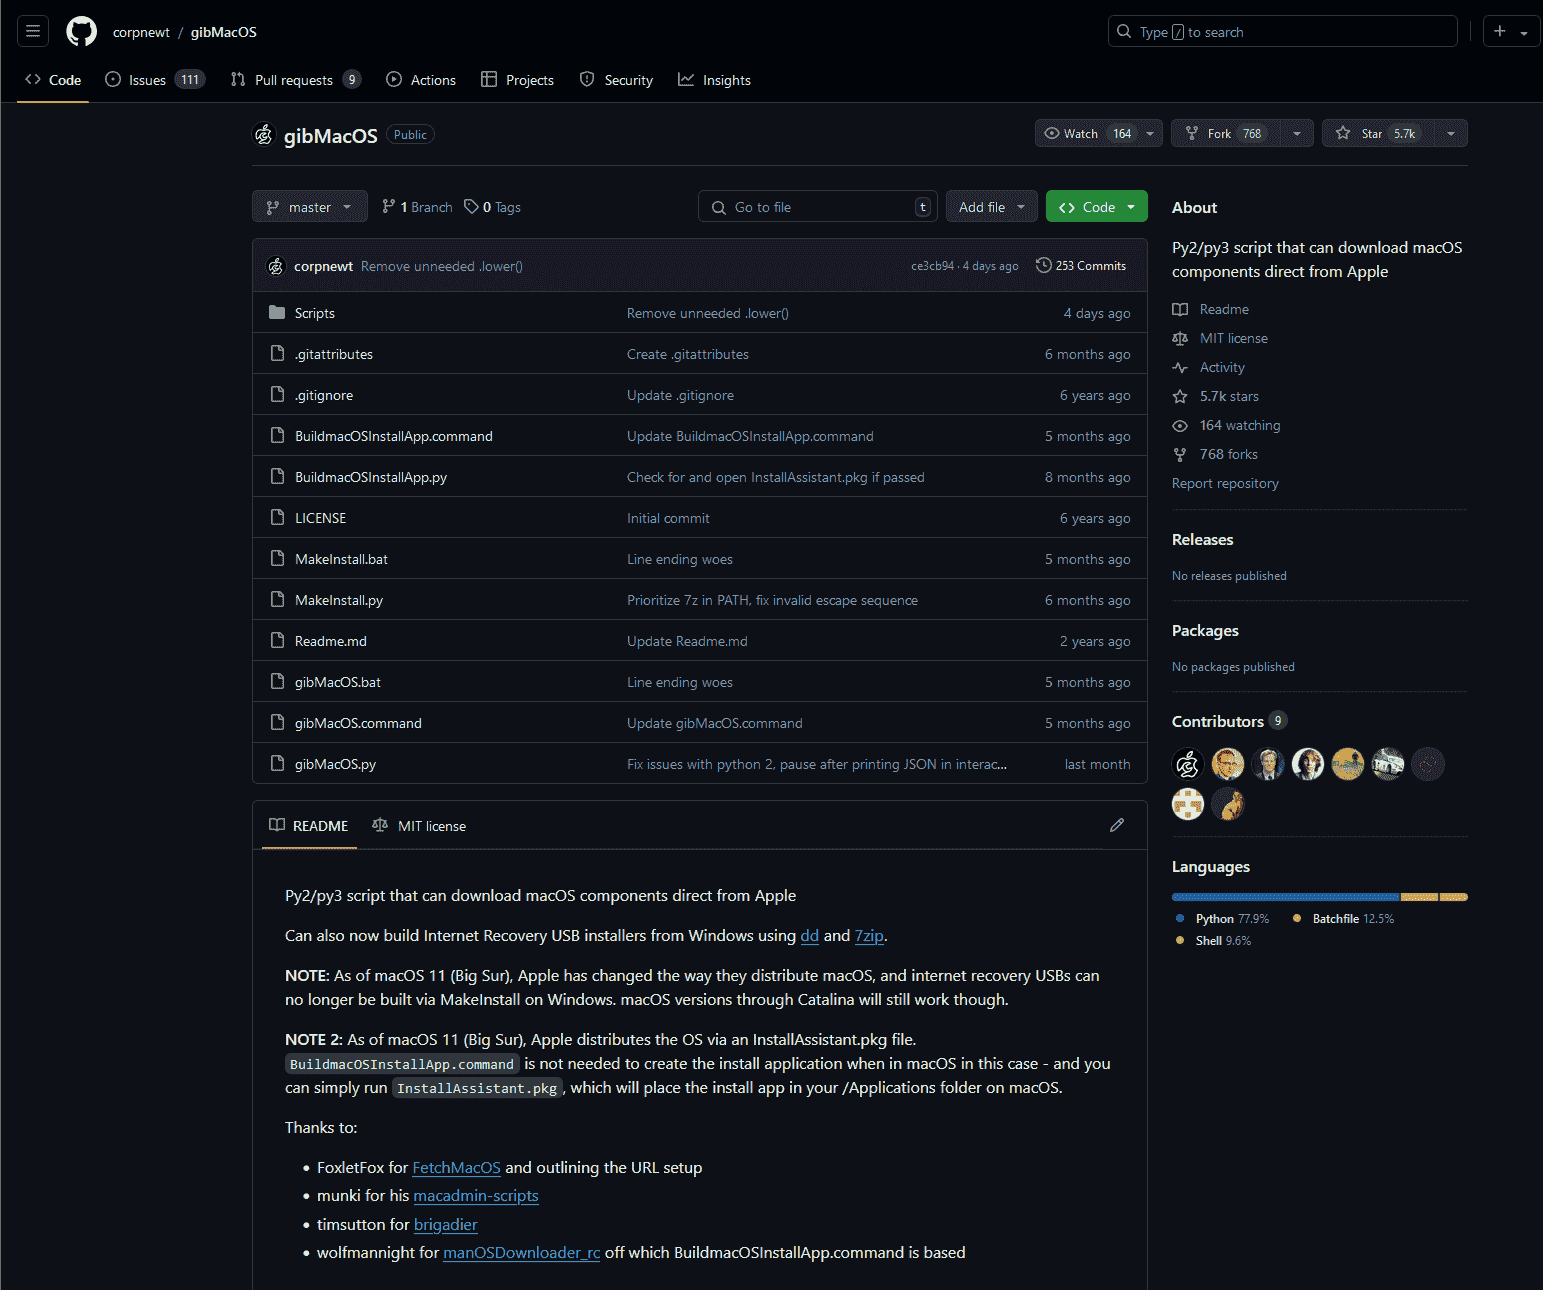
You’ll need to clone the repository, and that can be done via the big green button, or a classic
git clone https://github.com/corpnewt/gibMacOS
Once you’ve done that, you’ll want to pull open a terminal window in the gibMacOS folder and run:
gibMacOS.bat
You might be prompted to install python3 if your system does not have it currently installed.
Once that has been done, the gibMacOS program should pop open as such:
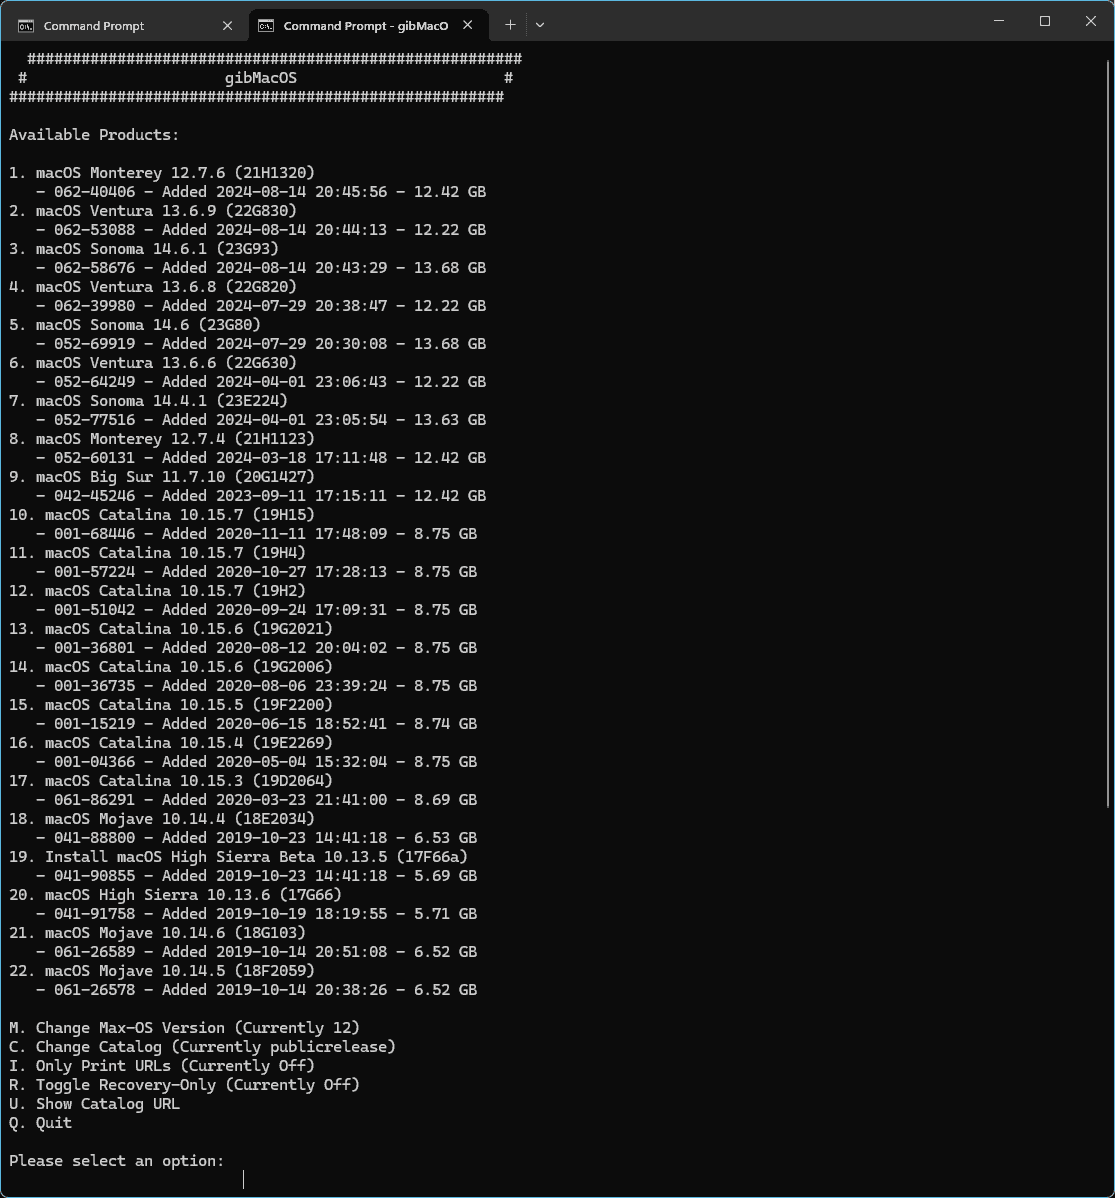
1 Is the option we’ll want for Monterey. Once you’ve made a selection, the build process should begin! The completed build should appear in. gibMacOS/MacOS Downloads.
Now, it’s time to get this to your Proxmox server in some manner. Mind you, this is not quite an ISO… more so a raw disk image. However, that doesn’t change much in the grand scheme of things! You’ve got a couple of options here, but you can either upload it to an attached network drive, and bring it over, or upload it to Proxmox’s default ISO holding directory (/var/lib/vz/template/iso) via SSH/SFTP.
Prepare an OpenCore image
You’ll also want to download Nick Sherlock’s OpenCore image from below
https://github.com/thenickdude/KVM-Opencore/releases
You’ll want to download the OpenCore.iso.gz file from the newest release in the repo (You’ll want at least v15), Just like the macOS Monterey image, you’ll want to move that over to your Proxmox install (Proxmox’s default ISO holding directory (/var/lib/vz/template/iso) via SSH/SFTP / Attached network drive).
Although this OpenCore image is in .iso format, this is not a disk image, and is actually a hard disk image.
Grabbing the OSK authentication key
Okay… so… this is the interesting part.
The macOS OSK key is needed to “ensure” that macOS is running on real Mac hardware. It’s a very long story, but this is one of the first legal hurdles. Technically, this is the “grey, secret, copyrighted” part, that Apple doesn’t want you to do. However, it happens to appear in a form on Page 3, line 16 of this court document!
It also happens to appear in this forum post on the Proxmox forums.
It can also happen to appear by creating a C file titled smc_read.c, and pasting in the first block of code from this link. Once you’ve done that, make sure you are in the same directory as the file, and run the following commands in a macOS terminal:
xcode-select --install # You'll need this if you didn't install the gcc build tools earlier
gcc -o smc_read smc_read.c -framework IOKit
./smc_read
Voilà!
Make note of this 64 character key, as we will need it in a minute.
VM Creation
Okay. Now we’re ready to build the VM. You’ll want to head over to your Proxmox management window, and create a virtual machine with the following settings:
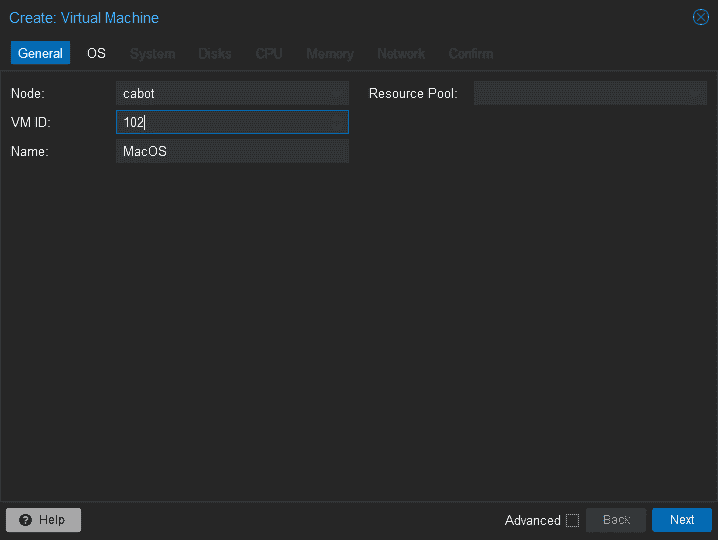
- Keep track of that VM ID!
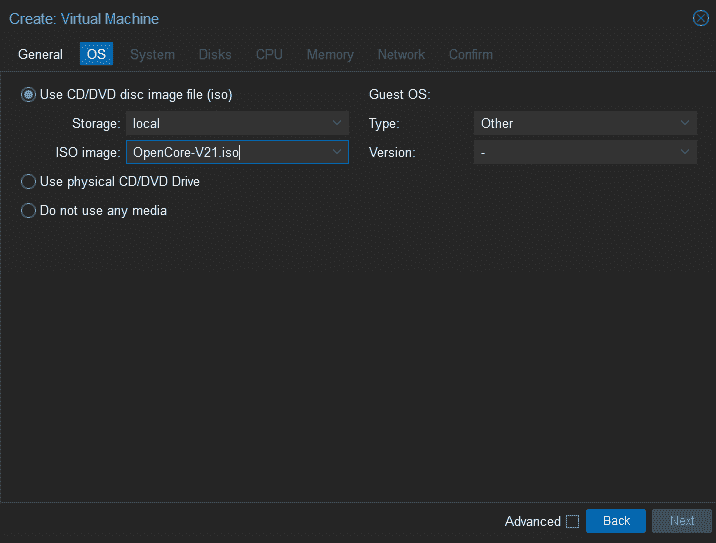
- Choose that OpenCore ISO we uploaded earlier, and set the OS type to “Other”
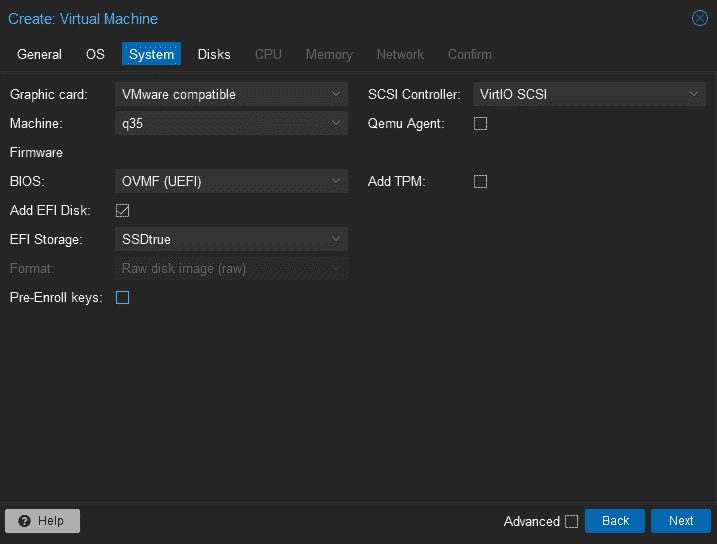
- Here, you’ll want to set the Graphics Card to “VMware Compatible”
- Set the SCSI Controller to “VirtIO SCSI”
- Set the machine type to “Q35”
- Set the BIOS to “OVMF (UEFI)”.
- Select the “Add EFI Disk” box, and choose a location to store it.
- Lastly, deselect “Pre-Enroll keys”
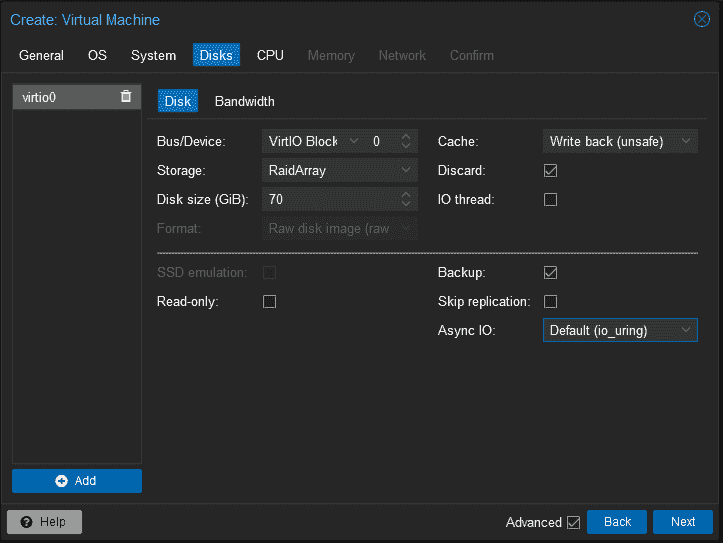
- Next up, you’ll want to set the size of the hard disk. You’ll probably want this to be on an SSD if your server has one, and you’ll want at least 64 GB. I’ve got 70 allocated here.
- You’ll want to set the bus to “VirtIO Block”.
- You’ll want to set the Cache to “Write back (unsafe)”. Otherwise, macOS will freak out.
- Select “Discard” to enable disk TRIM.
- Deselect “IO thread”.
- The rest is fine as is!
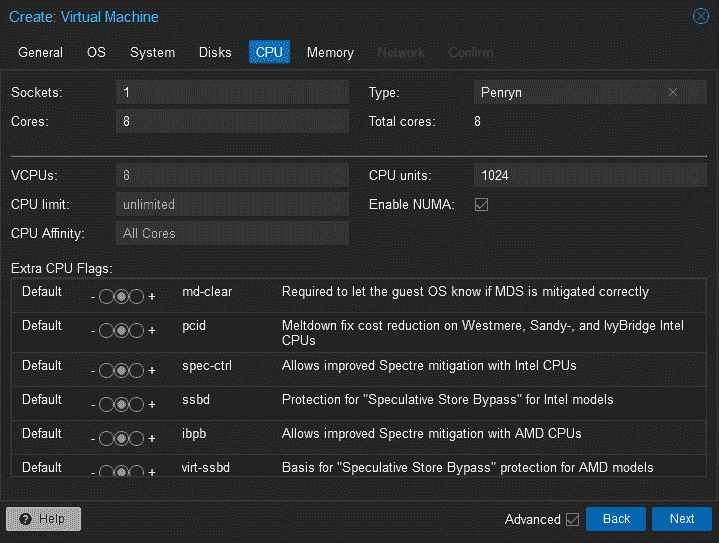
- Here, you get to decide how many cores to allocate to your VM. You’ve got to use a power of two for your core count here, or macOS will kernel panic.
- Interestingly, macOS couldn’t care less about the number of sockets used. So for example, if you’d like to use six cores, you can do three sockets of two cores each. So strange Mister Tim Apple…
- Otherwise, you’ll want to set the CPU type as “Penryn”, enable NUMA for these bad boys, and set the number of CPU units to 1024.
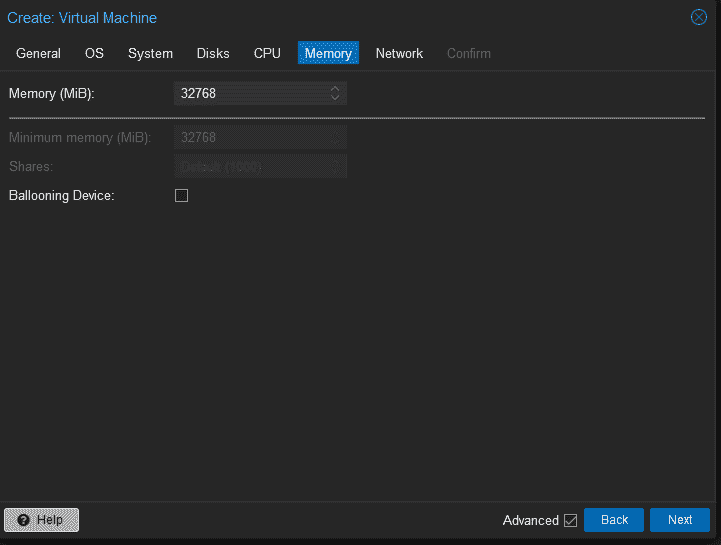
- Here, we’ll set the memory amount. No power of two funny business here. I’ve got 32GB allocated.
- However, you’ll want to disable “Ballooning Device”. MacOS will boot fine, but will be unstable as all heck.
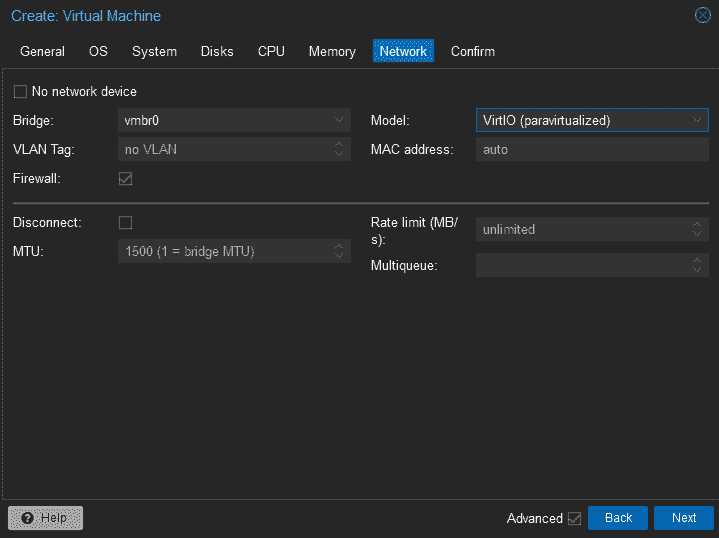
- Finally, for our Network tab, we’ll leave most things as is (Unless you plan to VLAN or rate limit, proceed as usual.)
- Other than changing the network adapter type to “VirtIO (paravirtualized)”
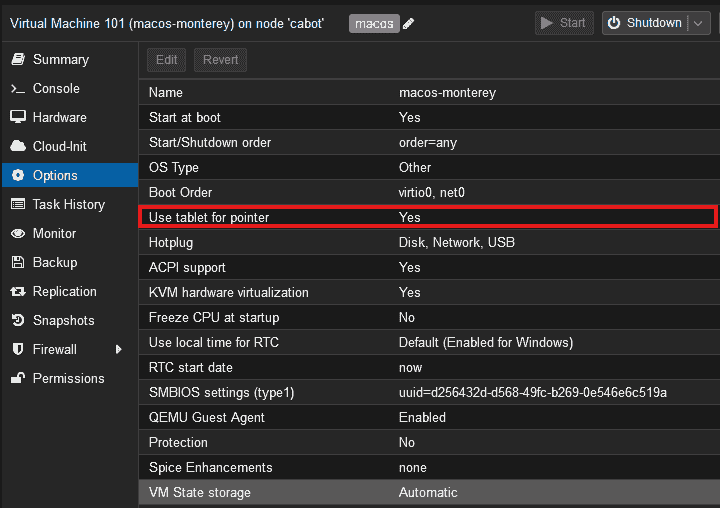
Next up, you’ll want to head over to the “Options” tab for the VM, and ensure that “Use Tablet for pointer” is enabled. It should be enabled by default, but it’s good to check.
Next, you’ll want to head over to the “Hardware” tab for the VM, and attach either your Monterey-full.img or Monterey-recovery.img as an IDE drive (make sure it’s at IDE0)
VM Configuration via SSH (do not skip!!!)
Time for further VM configuration!
From here on out, you will need to connect to your Proxmox host via SSH. This may seem a bit intimidating to a new user, but isn’t as complicated as it seems.
ssh *proxmox user*@*IP of host*
Hopefully this isn't your
rootuser! It is for me on this testbed
You’ll want to pull out that note with your VM ID, and your OSK key. We’ll need both in a second. You’ll now need to navigate to the correct folder. You’ll want to edit that VM’s config file using nano. No vim here! 😝
nano /etc/pve/qemu-server/*VM-ID*.conf
Next you’ll want to make a new line in this config file near the top, and add the following argument. You’ll need to fill in your OSK key here.
args: -device isa-applesmc,osk="THE-OSK-YOU-EXTRACTED-GOES-HERE" -smbios type=2 -device usb-kbd,bus=ehci.0,port=2 -global nec-usb-xhci.msi=off -global ICH9-LPC.acpi-pci-hotplug-with-bridge-support=off
It’s important to make sure all the CPU arguments are on one line, and not spread over several. Proxmox won’t be sure what to do with the excess lines, as they are not defined as VM arguments.
As Such!
![[Pasted image 20240824231202.png|]]
We’re killing a couple of birds here with the stones we have. We’ll be using Nick Sherlock’s VM arguments,
From nicksherlock.com
A USB keyboard is added here because macOS doesn’t support QEMU’s default PS/2 keyboard.
MSI has been disabled for the USB controller to fix QEMU panics when USB 3 devices are passed through.
ACPI PCIe hotplug support needs to be disabled for VMs with passthrough devices since QEMU Q35 machine model 6.1, which is what that final argument does. (You could instead choose Q35 6.0 for your Machine type on the Hardware tab). If you haven’t updated your QEMU to version 6.1 yet then remove this argument from the args. (Proxmox 7 ships with 6.0 and updated to 6.1 later on)
Thanks, Nick!
A couple more things while we are here, we need a couple of specific arguments for our Opterons. More generically, for AMD chips. You can tack this on the end of the args line.
-cpu Penryn,kvm=on,vendor=GenuineIntel,+kvm_pv_unhalt,+kvm_pv_eoi,+hypervisor,+invtsc,+pcid,+ssse3,+sse4.2,+popcnt,+avx,+avx2,+aes,+fma,+fma4,+bmi1,+bmi2,+xsave,+xsaveopt,+rdrand,check
This will add some extra bits for that “Penryn” CPU spoof from earlier, It will also expose all the needed CPU instructions. You may run into some problems at home if your CPU doesn’t support any of these features. However, if my Opterons can do it, you’ve got to be running some ancient hardware.
Extra
You can remove the
+invtscCPU flag if you’d like to be able to migrate the running VM across a Proxmox host network. It will boot without it
Finally, look for the lines defining ide0 and ide2 which are the two ISOs. We’ll need to switch how Proxmox treats these disk images. We’ll want it to behave at a proper drive, instead of a disk image. Likewise, we can do this by replacing ,media=cdrom with ,cache=unsafe.
Save your changes, and head back to the Proxmox UI.
Quick Proxmox Host Configuration.
A couple of quick host changes to make before booting the VM to quell a macOS boot loop, you’ll need to head over to the Proxmox console, and run two commands.
echo 1 > /sys/module/kvm/parameters/ignore_msrs
&&
echo "options kvm ignore_msrs=Y" >> /etc/modprobe.d/kvm.conf && update-initramfs -k all -u
The second command will make the parameter change across host reboots, which you’ll want!
macOS Installation
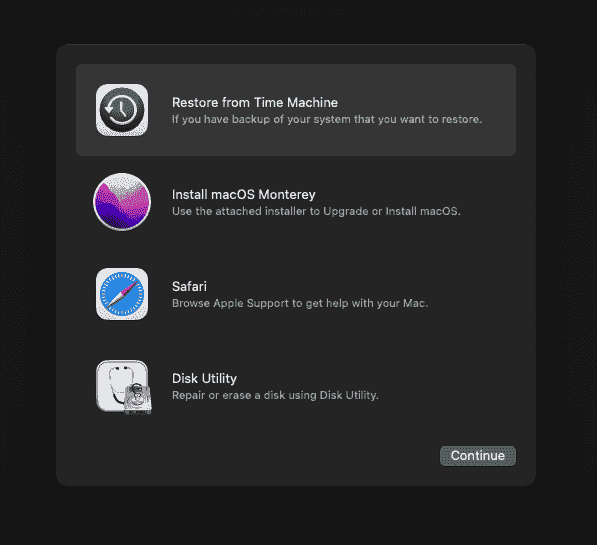
If all of the above is done correctly, the VM should now be able to boot up. At this point it should boot to the OpenCore boot picker.
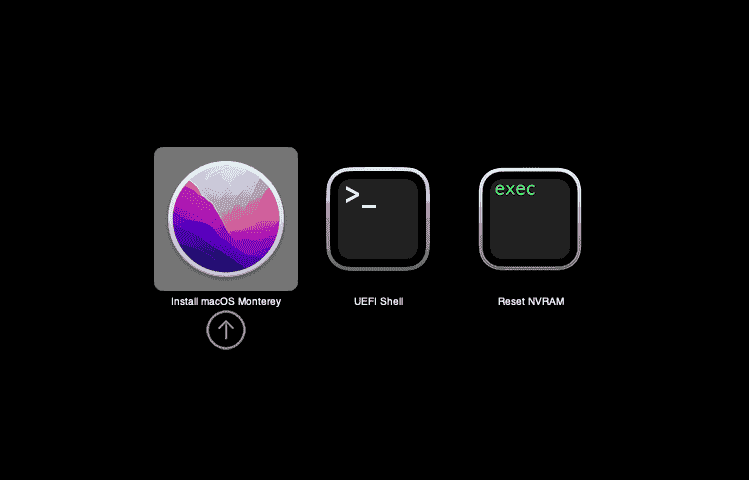
It should look like this! This is using Monterey-full.img built from a mac. If you use a recovery installer here, you should see “macOS Base System”.
You’ll want to select the first option, that being “Install macOS Monterey” or “macOS Base System”, and you should boot into the macOS installer page. Make sure both your OpenCore image and macOS image are mounted in Proxmox here, or you’ll either not boot, or not see the icon.
Alright. Congratulations on making it this far! macOS booted! To get to this point took me almost two years, due to hardware changes, hypervisor changes, and compiling of data. Mind you, this wasn’t a day-in, day-out project.
Alright. Before we continue we need to wipe our Proxmox virtual disk that we created earlier… There are a couple of ways to do this, but by far the easiest to us at the very moment would be to pop down to the “Disk Utility” tool at the bottom of the displayed option picker.
Once you arrive, you will want to highlight the “Apple Inc. VirtIO Block Media” disk, and click erase.
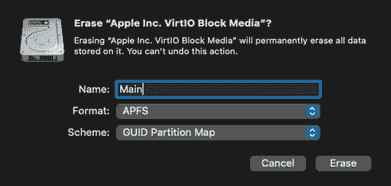
You’ll want to erase the disk in APFS, with a regular GUID Partition Map. You can name the disk however you’d like.
Click erase, let macOS do its thing, and you should be good to go!
Once the disk has been erased, you can back out to the macOS main installer menu again!
You can now proceed to the installation! Select “Install macOS Monterey”, and then select the disk that you just erased. I chose “Main”.
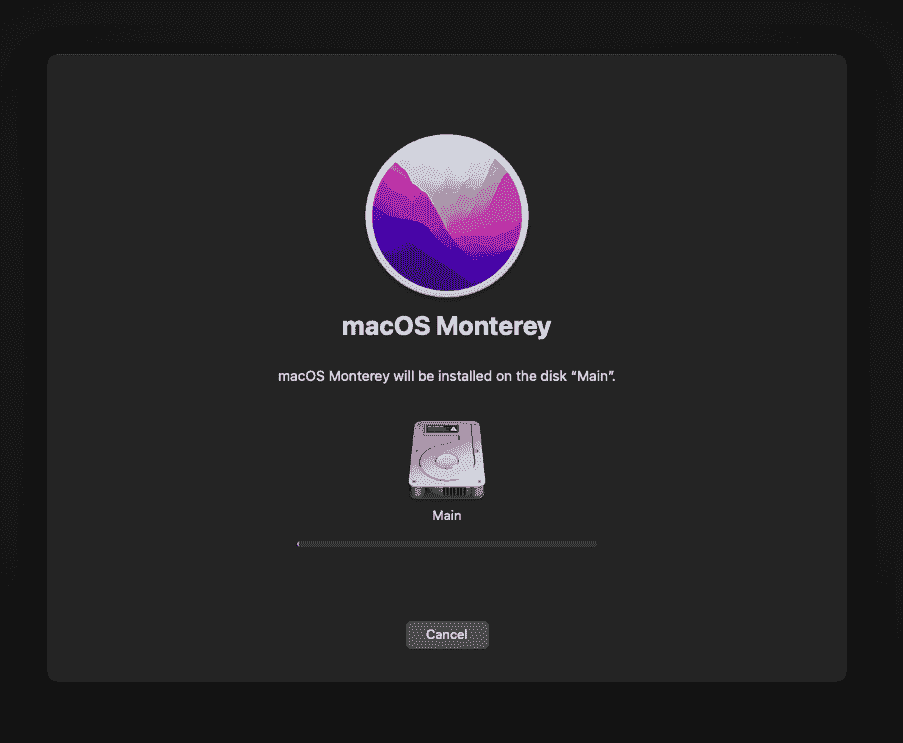
Now macOS should begin to install! This is quite exciting! macOS will now restart several times, but you cannot go to grab a coffee yet.
Each time macOS restarts, you have to select “macOS installer” with the hard disk icon each time.
If the Proxmox VM gets stuck here, or the following screen does not appear, you can safely reboot the VM
macOS will not auto install this for you, but it’s just highlighting the correct menu entry a couple of times.
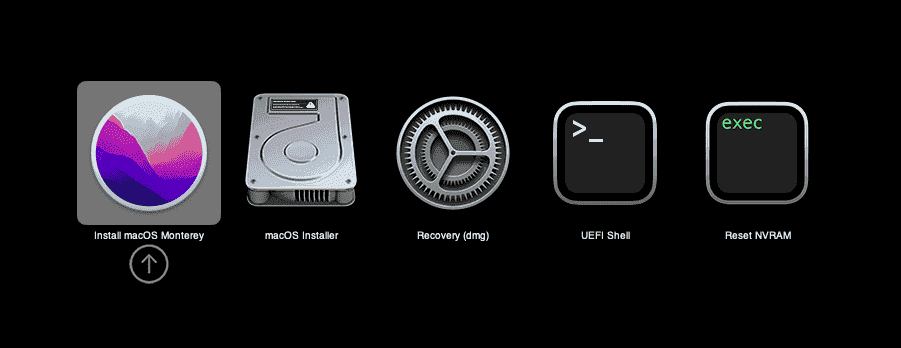
At a certain point in the installation, the “macOS installer” disk will disappear, and be replaced with a hard disk named after your bootable main disk (that you created earlier, mine is named “Main”).
Keep picking that second menu entry until you boot into Monterey.

and with some luck… Monterey!
You’ll want to power through the installation wizard here, and you should be all good to go!
DO NOT LOG INTO YOUR APPLE ID HERE, WE ARE GOING TO DO THIS LATER.
This will blacklist your Apple ID, as the VM is still using the default OpenCore serial number. Apple will insta-blacklist you for doing this, and is a MASSIVE PAIN to undo. You will basically need to restart, and pray that they didn’t blacklist your IP.
…got it?

Welcome to Monterey!
Now, I will warn you, this is going to be slow as molasses at first. No video acceleration, paired with some of the slowest single core CPU’s I’ve ever seen, along with macOS initial setup housekeeping tasks is not a great time.