As written by irazasyed:
And modified by Alexandre DesAulniers:
Step 1: Enable 2-Factor Authentication
To proceed with this method, ensure that you have enabled two-factor authentication for your Google account. If you haven’t done so already, you can follow the link to set it up → Enable 2FA in your Google account. You’ll want to ensure that you remember to remove this, or be ready to transfer when your term comes to an end.
Step 2: Create an App Password for Mail
In your Google account settings, create an App Password specifically for Mail. Follow this link to create the App Password → Create an App Password (You will need to copy and use this password later along with your Gmail address in the Google SMTP server settings in the “Add another email address” form).
Step 3: Add Your Cloudflare-Routed Email Address to Gmail
Open Gmail and navigate to Settings → Accounts → Send mail as. In this section, click on “Add another email address” and fill out the form with your name and your Cloudflare-routed email address. Untick the “Treat as an alias” option and click on “Next Step.”
Step 4: Fill Out the Next Form
SMTP Server: smtp.gmail.com
Port: 587
Username: Your Gmail address (including @gmail.com)
Password: The App Password you generated in Step 2
Leave TLS enabled
Click on Add Account
You will receive an email from Gmail asking you to confirm ownership by providing a code. Enter the code in the dialog box or click the link provided in the confirmation email to complete the process.
Step 5: Update Email Settings in Your Google Account
Navigate to your email settings and scroll down to the “Alternate Emails” section.
Step 6: Add Cloudflare-Routed Email Address
Add your Cloudflare-routed email address as an alternate email.

Step 7: Confirm Alternate Email
Wait for an email from Google and confirm your alternate email.
I had an issue where the added email wasn’t coming through for the first few hours… Google may be rate limiting your address (slowing you down). It took me a few hours before the email would come through.
Sorry for the wait 🤷

Step 8: Set Custom Email as Default
In Gmail, navigate to Settings → Accounts → Send mail as, and set your custom email as the default. This step ensures that your profile picture is associated with your outgoing emails.

Step 9: Enjoy Your Profile Picture in Emails
Congratulations! All emails sent from your Cloudflare-routed email address will now feature your Google profile picture.
Step 10: Set your Primary Address as your New Address
You’ll want to head over to your Gmail settings, and set your new address as your default address for the account.
That’s it!
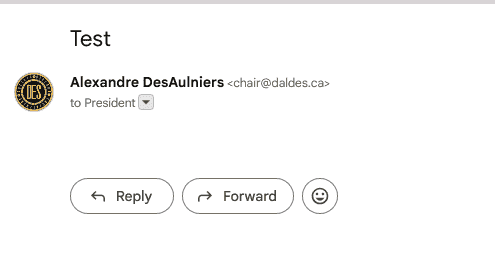
You have successfully configured Gmail SMTP with Cloudflare Email Routing. Now, when composing a new message in Gmail, you can select your new email address from the list. Additionally, when replying to an email received at your new address, the new address should automatically populate in the From: field.
Credits
This guide is based on the following published resources below.